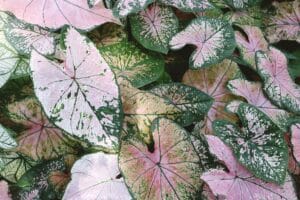
Growing a vibrant caladium in your home or garden brings an instant splash of tropical color to spaces that otherwise receive limited direct sunlight. Known for their striking, paper-thin leaves patterned with brilliant shades of pink, red, white, and deep green, these tropical foliage plants are highly prized by indoor gardeners and shade-loving landscapers alike.
While many gardeners assume that intense color requires blazing sun, the truth is that these plants thrive beautifully in medium indirect light. In fact, harsh, direct rays can easily scorch their delicate leaves, fading the very patterns you want to preserve. By understanding how to balance light, moisture, and nutrition, you can cultivate stunning, colorful foliage that remains lush and vibrant throughout the active growing season.
Defining Medium Indirect Light
To successfully grow these plants indoors or in shaded garden spots, it is essential to understand what “medium indirect light” actually means. In horticultural terms, this level of illumination typically ranges between 100 and 250 foot-candles.
It is the kind of light found in the middle of a well-lit room, a few feet away from an east- or west-facing window, or behind a sheer, protective curtain on a south-facing window. Outdoors, this equates to dappled shade beneath a high tree canopy or the soft, reflected light found on a covered north-facing patio.
When positioning your caladium, finding the right balance is key. You can easily measure this light using a digital lux meter or a smartphone light meter app. Alternatively, you can perform the simple shadow test.
Hold your hand about a foot above a sheet of white paper in the spot where you plan to place your plant. If you see a soft, blurry, and indistinct shadow, you have found the perfect medium indirect light.
A sharp, highly defined shadow indicates bright direct or indirect light, which might be too intense. Conversely, no visible shadow at all suggests low light, which will cause the colorful patterns to fade into a dull, solid green.
The Science of Leaf Coloration in Shade
The breathtaking patterns on caladium leaves are the result of a delicate genetic balance between chlorophyll and other pigments. Chlorophyll is the green pigment responsible for photosynthesis, while anthocyanins produce reds and pinks, and carotenoids produce whites and yellows.
In their natural habitat beneath dense tropical rainforest canopies, these plants have evolved to maximize light absorption while protecting their delicate tissues from sun damage. When placed in medium indirect light, the plant is stimulated to maintain its beautiful variegation.
If the light is too dim, the plant will compensate by producing more chlorophyll to capture whatever light is available. This process causes the brilliant pinks, reds, and whites to be overtaken by solid green, resulting in a loss of the striking contrast that makes them so desirable.
Conversely, if the light is too intense, the delicate non-green areas of the leaves—which lack protective chlorophyll—will quickly sunburn. This causes them to turn brown, crispy, and paper-dry. Providing stable, filtered illumination ensures that the plant can photosynthesize efficiently without sacrificing its brilliant ornamental colors.
Selecting the Best Caladium Cultivars for Medium Light
Not all caladium varieties are created equal when it comes to light tolerance. Generally, these plants are divided into two main categories based on leaf shape: fancy-leafed and strap-leafed.
Fancy-leafed varieties feature large, heart-shaped leaves and tend to perform exceptionally well in medium indirect light, as their broad surface area is highly efficient at gathering filtered light. Strap-leafed varieties have narrower, lance-shaped leaves and are often slightly more tolerant of sun, though they still flourish in shaded environments.
Some of the finest caladium cultivars for medium light include:
- ‘White Christmas’: This classic fancy-leaf variety features large, snowy-white leaves accented by deep green veins, creating a clean, high-contrast look that brightens up dark corners.
- ‘Candidum’: Similar to ‘White Christmas’, this variety offers broad white leaves with delicate green veining, making it a staple for elegant shade gardens.
- ‘Gingerland’: A dwarf strap-leaf variety that boasts creamy-white leaves speckled with bright pink or red dots and framed by a rich green margin.
- ‘Miss Muffet’: A compact, dwarf variety with lime-green leaves speckled with vibrant pink spots, perfect for small indoor pots or tabletop displays.
- ‘Fannie Munson’: For those who crave intense color, this variety delivers massive, translucent pink leaves with deep green borders.
For detailed guidance on selecting the right varieties for your specific growing conditions, you can consult the University of Florida IFAS Extension guidelines on cultivar selection and care, which offer extensive research on performance and light tolerances.
Soil Composition and Potting Mixes
The foundation of healthy caladium foliage lies beneath the surface. These plants grow from underground tubers that are highly sensitive to standing water.
Therefore, the potting medium must offer excellent drainage while retaining sufficient moisture to keep the roots hydrated. A high-quality, peat-based potting mix is ideal.
Peat moss provides the necessary acidity—as these plants prefer a slightly acidic soil pH between 5.5 and 6.5—while retaining moisture without becoming compacted. To optimize this mix for container growth, combine:
- 2 parts peat moss or coco coir (for moisture retention and acidity)
- 1 part perlite or coarse sand (to ensure rapid drainage and aeration)
- 1 part organic compost or worm castings (to provide a steady, gentle supply of nutrients)
Avoid using heavy garden soil in pots, as it packs down tightly, suffocating the roots and trapping water around the tuber, which inevitably leads to rot. If planting in the ground, amend heavy clay soils with generous amounts of organic matter, leaf mold, and coarse sand to raise the planting bed and improve drainage.
Watering and Moisture Consistency
Maintaining the correct moisture level is perhaps the most critical aspect of caring for these tropical beauties. During their active spring and summer growing season, they require consistent moisture.
The soil should feel like a well-wrung sponge—damp to the touch but never muddy or waterlogged. While some homeowners prefer hardy low-water plants that tolerate long dry spells, the caladium demands a more attentive watering schedule.
To achieve this balance, water the plant thoroughly until water runs out of the drainage holes at the bottom of the pot. Allow the top inch of the potting mix to dry out slightly before watering again.
Never let the soil dry out completely, as this will trigger the plant to enter premature dormancy, causing the leaves to droop, wither, and die back. If you notice the lower leaves turning yellow and the stems becoming soft or mushy at the base, you are likely overwatering.
Conversely, dry, crispy brown leaf margins indicate that the plant is thirsty or that the surrounding air is too dry. Always use room-temperature water, as cold tap water can shock the tropical root system and stunt growth.
Temperature and Humidity Requirements
Hailing from the warm, humid regions of Central and South America, these plants demand tropical conditions to thrive. They are highly sensitive to cold temperatures and will stop growing or begin to die back if exposed to drafts or chilly air.
To keep your caladium happy, maintain the ambient temperature between 70°F and 85°F (21°C to 29°C) during the day, ensuring it does not drop below 60°F (15°C) at night. Keep pots away from cold drafty windows, air conditioning vents, and exterior doors.
Humidity is equally vital for maintaining those delicate, paper-thin leaves. Ideally, the relative humidity should remain above 50% to 60%.
If your indoor air is dry, especially during the summer when air conditioning is running, you can boost humidity using several methods:
- Humidifier: Placing a small ultrasonic humidifier near your plants is the most effective way to maintain stable humidity levels.
- Pebble Tray: Fill a shallow tray with pebbles and water, then place the pot on top of the pebbles. Ensure the bottom of the pot does not touch the water directly, as this can lead to waterlogged soil.
- Grouping Plants: Grouping your tropical plants together creates a microclimate with higher localized humidity through collective transpiration.
Fertilization Strategies for Maximum Color
To support the rapid production of large, colorful leaves, your caladium requires regular feeding throughout the active growing season. However, fertilization must be approached with care, as an incorrect nutrient balance can ruin the very colors you are trying to promote.
Avoid fertilizers with excessively high nitrogen content. Nitrogen encourages rapid vegetative growth and chlorophyll production, which can turn highly variegated pink, red, or white leaves into a solid, uninspiring green.
Instead, opt for a balanced, water-soluble fertilizer (such as a 10-10-10 or 5-10-10 formula) diluted to half-strength. Apply the diluted fertilizer every two to three weeks from spring through late summer.
Stop fertilizing entirely by late summer as the plant prepares for its natural autumn dormancy. This allows the tuber to store energy without being forced into producing weak, late-season growth that will only die off when the cold weather arrives.
Overwintering and Seasonal Dormancy
One of the most common mistakes beginners make is throwing away their caladium when it begins to look tired and droopy in the autumn. These are tuberous perennials with a distinct, mandatory dormancy period.
As the days grow shorter and temperatures cool in the fall, the plant will naturally stop producing new leaves, and the existing foliage will begin to yellow and collapse. This is a normal part of its life cycle, not a sign of failure.
When this occurs, gradually reduce watering, allowing the remaining leaves to wither completely. The plant is transferring its remaining energy from the leaves down into the underground tuber for winter storage. Once the foliage is entirely dry, cut it off at the soil level.
If you live in USDA hardiness zones 9 to 11, you can leave the tubers in the ground or in outdoor pots, provided the soil does not freeze. In colder climates (zones 8 and below), you must lift the tubers to save them for the next year:
- Carefully dig up the tubers after the first light cool spell, taking care not to bruise or cut them.
- Shake off the excess soil and let them dry in a warm, shaded, well-ventilated area for a week to cure.
- Once dry, brush away any remaining loose soil and trim off dry roots.
- Store the cured tubers in a breathable container, such as a paper bag, cardboard box, or mesh sack, packed in dry peat moss, vermiculite, or wood shavings.
- Keep the storage container in a dark, dry location where temperatures remain consistently between 60°F and 65°F (15°C to 18°C). Do not store them in a cold garage or refrigerator, as temperatures below 50°F will kill the tubers.
In the spring, when soil and air temperatures consistently rise above 70°F, you can replant the tubers in fresh potting mix to start the cycle anew.
Troubleshooting Common Issues
Even with the best care, your caladium may occasionally run into challenges. Recognizing the early signs of trouble can help you save your plants before permanent damage occurs.
Let’s look at some of the most common issues you might encounter:
- Spider Mites: These tiny pests thrive in warm, dry conditions and can quickly sap the life from delicate leaves. Look for fine webbing on the undersides of leaves and dusty, speckled discoloration. Treat by washing the leaves with a gentle spray of water and applying organic insecticidal soap or neem oil.
- Fungus Gnats: If the soil is kept too wet, small black flies may hover around the pot. Reduce watering frequency, let the top soil dry out, and use yellow sticky traps to catch adults.
- Tuber Rot: Caused by cold, soggy soil, this fungal issue makes the stems collapse and turn mushy at the base. If the tuber itself becomes soft and smelly, it cannot be saved and must be discarded. Prevention through excellent drainage is key.
- Leaf Spot: Fungal or bacterial leaf spots appear as brown or black circles with yellow halos. Avoid overhead watering to keep the foliage dry, and ensure good air circulation around your plants.
Understanding the Caladium Growth Cycle
To truly master caladium care, it helps to understand the natural rhythm of its development. These plants do not grow continuously like many other tropical houseplants. Instead, they operate on a strict seasonal clock dictated by temperature and day length.
When you first plant a caladium tuber in the spring, it requires patience. The tuber must be kept warm—ideally around 70°F to 75°F—for the first roots and shoots to emerge. This initial awakening phase can take anywhere from two to six weeks depending on soil temperature.
As the caladium enters its peak summer phase, it undergoes a rapid explosion of growth. During this time, the plant will continuously push up new leaves from the center of the tuber. Each leaf typically lasts for several weeks before naturally declining to make room for newer, larger foliage.
By late summer, the growth rate will naturally slow down. The plant is shifting its focus from leaf production to nutrient storage. Understanding this cycle prevents panic when the plant stops growing new leaves in the early autumn.
Caladium Propagation: How to Divide Tubers Safely
Propagating your caladium is an excellent way to expand your collection or share these beautiful plants with friends. The most reliable method of propagation is tuber division, which is best performed in the early spring just before replanting.
Before dividing a caladium tuber, ensure that it is healthy, firm, and free of soft spots. Look closely at the tuber to locate the “eyes” or growth buds. These look like small, raised bumps on the surface, similar to the eyes on a potato.
Using a sharp, sterilized knife, carefully cut the tuber into sections. Each section must contain at least one healthy eye to ensure successful growth. If a section does not have an eye, it will not be able to produce new foliage.
Once cut, let the caladium pieces dry in a warm, well-ventilated area for 24 to 48 hours. This allows the cut surfaces to callously over, which protects the newly divided tubers from fungal infections and rot when they are planted in moist soil.
Designing with Caladiums in Home Decor and Shade Gardens
Integrating a caladium into your interior design can instantly elevate the aesthetic of any room. Their bold, colorful patterns act as living artwork, contrasting beautifully with minimalist decor or complementing a maximalist bohemian style.
For outdoor shade gardens, a caladium acts as a brilliant focal point. They can be used to brighten up dark pathways, border shaded patios, or fill in the gaps beneath tall, leafy shrubs where grass and flowers struggle to grow.
Pairing your caladium with ferns, hostas, or astilbes creates a stunning contrast in texture and form. The broad, smooth leaves of the caladium stand out beautifully against the delicate, feathery fronds of ferns and the deeply textured foliage of hostas.
Caladium Toxicity and Safety Precautions
While the caladium is incredibly beautiful, it is important to note that all parts of the plant are toxic to humans and pets. The leaves and stems contain calcium oxalate crystals, which can cause severe irritation if ingested or touched with bare skin.
If you have curious pets or toddlers, place your caladium on a high shelf, a hanging basket, or a secure plant stand where it is completely out of reach. This ensures that everyone in your home remains safe while enjoying the plant’s beauty.
When handling the plant during potting, pruning, or dividing tubers, it is a good practice to wear gardening gloves. If the sap comes into contact with your skin, wash it off immediately with warm, soapy water to prevent mild itching or redness.
Frequently Asked Questions About Caladium Care
Can a caladium grow in complete shade?
While they are shade-loving plants, they cannot survive in complete darkness. They need medium indirect light to photosynthesize and maintain their vibrant colors. Without sufficient light, the leaves will lose their variegation and turn solid green.
Why are my caladium leaves turning green?
If your plant’s leaves are losing their pink, red, or white patterns and turning solid green, it is usually a sign of insufficient light. Move the plant to a slightly brighter location that receives consistent, filtered indirect sunlight.
How long does a caladium live?
With proper care and overwintering, the tubers can live for several years. Each growing season lasts about six to eight months, followed by a mandatory dormancy period of three to five months during the winter.
Conclusion
Cultivating these magnificent tropical plants in medium indirect light is a rewarding way to bring vibrant, artistic patterns into your home or shaded garden spaces. By providing a well-draining potting mix, maintaining consistent moisture, and protecting them from cold drafts, you can enjoy a spectacular display of colorful foliage from spring through autumn.
Remember to respect their natural seasonal cycle, ensuring your caladium remains healthy and colorful throughout its active growing cycle. With just a little attention to their basic needs, these stunning shade-lovers will reward you with an unmatched tapestry of tropical color year after year.